🔁 Button Debouncing on ESP32 with Arduino
🧠 Part 1: What Is Button Debouncing?
When you press a button, the contacts inside don’t make a perfect connection immediately. Instead, they physically bounce for a few milliseconds. This causes the signal to fluctuate rapidly between HIGH and LOW — even though you pressed the button just once.
🧨 The Problem:
Without debounce logic, your ESP32 may detect multiple button presses for one actual press.
🔍 Part 2: What Does Bounce Look Like?
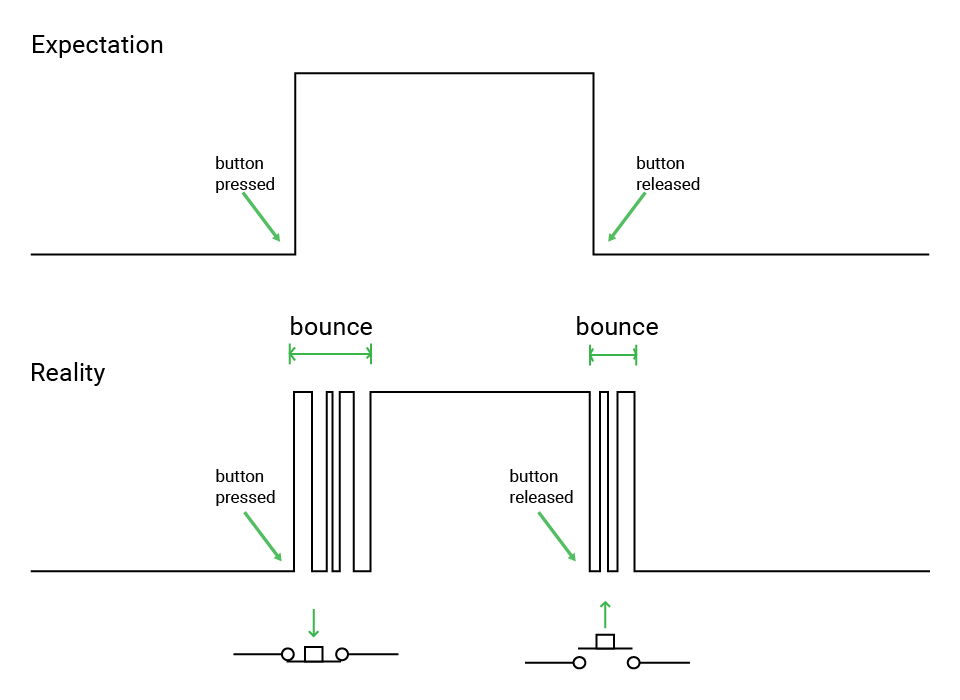
The microcontroller sees this and thinks:
“The button was pressed and released multiple times!”
💡 Part 3: How Debouncing Fixes It
Absolutely! Let’s break down the debounce logic step by step in a way that makes it super easy to understand:
🧠 Why Do We Need Debouncing?
When you press a button, it doesn’t make a clean contact right away. Instead, the metal inside the button might vibrate or “bounce”, causing the signal to flicker between HIGH and LOW rapidly for a few milliseconds.
To us, that’s just a single press.
To the ESP32? It looks like this:
LOW → HIGH → LOW → HIGH → LOW → (finally stable)
If we don’t filter that out, the ESP32 might think we pressed the button 5 times instead of once.
🔁 So What’s the Debounce Logic?
We use a simple idea:
“Only accept a button press if the signal stays the same for a short amount of time (e.g., 50 milliseconds).”
🧩 Step-by-Step Logic:
-
🔍 Read the button’s current state using
digitalRead(). - 🧠 Compare it to the previous reading (
lastButtonState):- If it’s different, it might be a real press — or just a bounce.
- So we reset a timer (
lastDebounceTime) to note when the change was first seen.
-
⏱ Wait a short time (e.g. 50 ms) to see if the new state stays the same.
-
✅ If the state is still the same after the delay, accept it as a real change.
- 🚀 Finally, if the new (debounced) state is
LOW(button pressed), perform the action, like printing to serial or toggling an LED.
🔌 Part 4: Wiring the Button
Same as GPIO Digital Input: Using a Button with ESP32
🧩 Option A: Using an Extension Board (Recommended for Beginners)
If you’re using an ESP32 extension board, good news! 🎉
- You don’t need to worry about pull-up resistors.
- Just use female-to-male jumper wire and connect corrdingly.
| LED Board Pin | ESP32 Pin | |—————|——————| | GND | GND | | 5V | 5V | | LED1 | GPIO2 (D2) | | SW1 | GPIO14 |
- The board handles resistor setup internally, making things safer and more reliable.
🧪 Option B: Breadboard Wiring (Manual Setup)
| Component | ESP32 Pin |
|---|---|
| One side of button | GND (ground) |
| Other side (diagonally) | GPIO14 |
| Pull-up resistor (10kΩ) | Between GPIO14 and 3.3V |
| LED1 | GPIO12 (D12) |
🔧 Or, skip the external resistor by using INPUT_PULLUP mode in your code.
Note: be careful with the direction of LED and remeber to connect a resistor in series with the LED
- Long leg = positive (anode)
- Short leg = negative (cathode)
Basic Diagram (Text version):
 3.3V ──┐
        │
       [10kΩ]
        │
GPIO14 ─┴──── Button ───── GND
🧾 Part 5: Arduino Code – Debounced Button Toggle
Here’s the full code that:
- Debounces the button
- Toggles the LED on each press
- Prints the result over UART
const int buttonPin = 14;   // GPIO connected to button
const int ledPin = 2;       // LED pin (built-in or external)

int buttonState = HIGH;             // Current debounced state
int lastButtonState = HIGH;         // Last raw state
unsigned long lastDebounceTime = 0; // Timestamp of last change
const unsigned long debounceDelay = 50; // Delay in ms

bool ledOn = false; // LED state

void setup() {
  Serial.begin(115200);               // Start Serial Monitor
  pinMode(buttonPin, INPUT_PULLUP);   // Internal pull-up: HIGH when not pressed
  pinMode(ledPin, OUTPUT);            // LED output
}

void loop() {
  int reading = digitalRead(buttonPin); // Raw state

  // If state changed, reset timer
  if (reading != lastButtonState) {
    lastDebounceTime = millis();
  }

  // If stable for debounceDelay, accept new state
  if ((millis() - lastDebounceTime) > debounceDelay) {
    if (reading != buttonState) {
      buttonState = reading;

      // Only toggle on button press (LOW = pressed due to pull-up)
      if (buttonState == LOW) {
        ledOn = !ledOn;
        digitalWrite(ledPin, ledOn ? HIGH : LOW);
        Serial.println(ledOn ? "LED ON" : "LED OFF");
      }
    }
  }

  lastButtonState = reading; // Save reading for next loop
}
⚠️ A Note on delay()-Based Debouncing: Not Ideal for Complex Systems
In our current example, we used a simple delay-based software debounce using delay() or millis(). This is great for beginners and small projects, but in more complex systems, this approach is not recommended.
Why?
In complex and multitasking microcontroller systems, using simple looping delays for debounce can waste valuable CPU time and reduce system responsiveness and real-time performance.
In other words, the CPU is stuck waiting during that 50ms delay — doing nothing else — which is a huge problem if your system needs to handle multiple tasks or respond quickly to other events.
✅ Better Approaches for Debouncing
- Timer Interrupts
- Set up a hardware timer that triggers an interrupt at regular intervals.
- Use the interrupt to check and update button states.
- Keeps your main loop free for other tasks.
- Non-blocking millis()-based Debounce
- Instead of
delay(), usemillis()to track time and debounce without halting the loop. - More efficient and allows multitasking within the main loop.
- Instead of
🧠 Comparison Table
| Method | Blocking? | Real-Time Friendly? | Difficulty | Recommended For |
|---|---|---|---|---|
delay() Debounce |
✅ Yes | ❌ No | ⭐ Easy | Beginners, simple projects |
millis() Debounce |
❌ No | ✅ Yes | ⭐⭐ Medium | Projects with multitasking |
| Timer Interrupt Debounce | ❌ No | ✅✅ Very Good | ⭐⭐⭐ Advanced | High-performance applications |